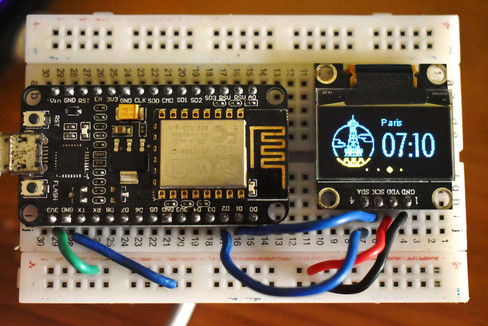
NodeMCU World Clock
- Ramesh G
- May 8, 2022
- 3 min read
Updated: Dec 29, 2022

In this tutorial, we will see how to make NodeMCU based World Clock using OLED display. Here, you don’t need Real Time Clock Module and time will be updated through wifi. we have added world’s 4 popular cities, you can add more if you want.
Circuit Diagram

Components Required
0.96 OLED 4wire Module - 1no
Node MCU ESP8266 12E Dev Module- 1 no
Oled Display

This 0.96” I2C OLED Display is an OLED monochrome 128×64 dot matrix display module with I2C Interface. It is perfect when you need an ultra-small display. Comparing to LCD, OLED screens are way more competitive, which has a number of advantages such as high brightness, self-emission, high contrast ratio, slim outline, wide viewing angle, wide temperature range, and low power consumption. It is compatible with any 3.3V-5V microcontroller, such as Arduino.

Pin Definition
1.GND: Power ground 2.VCC: Power positive 3.SCL: Clock wire 4.SDA: Data wire.
Specifications
Size: 0.96 inch
Resolution: 128 x 64
Controlling Chip: SSH1106
Driving Voltage: 3.3-5V
Operating Temperature: -40~70 celsius
Interface Type: IIC
Light Color: White
Data Sheet Download
Installing Library
To install the library navigate to the Sketch > Include Library > Manage Libraries… Wait for Library Manager to download libraries index and update list of installed libraries.
Download SSD1306Wire.h Library , we need to use this library for SSD1306 OLED display
Download JsonListener.h_Library , we need to use this library for json-streaming-parser-master
Download misc Library , we need to use this library for weather
After installing the required libraries, copy the following code to your Arduino IDE.
arduino code
#include <Arduino.h>
#include <ESP8266WiFi.h>
#include <ESP8266HTTPClient.h>
#include <Ticker.h>
#include <JsonListener.h>
#include <SSD1306Wire.h>
#include <OLEDDisplayUi.h>
#include <Wire.h>
#include <WorldClockClient.h>
#include "icons.h"
#include "fonts.h"
const char* WIFI_SSID = "TP-Link_3200";
const char* WIFI_PWD = "95001121379884265554";
// Setup
const int UPDATE_INTERVAL_SECS = 10 * 60; // Update every 10 minutes
// Display Settings
const int I2C_DISPLAY_ADDRESS = 0x3C;
const int SDA_PIN = D2;
const int SDC_PIN = D1;
// TimeClient settings
// Initialize the oled display for address 0x3c
// sda-pin=14 and sdc-pin=12
SSD1306Wire display(I2C_DISPLAY_ADDRESS, SDA_PIN, SDC_PIN);
OLEDDisplayUi ui ( &display );
/***************************
* End Settings
**************************/
String timeZoneIds [] = {"America/New_York", "Europe/London", "Europe/Paris", "Australia/Sydney"};
WorldClockClient worldClockClient("de", "CH", "E, dd. MMMMM yyyy", 4, timeZoneIds);
// flag changed in the ticker function every 10 minutes
bool readyForUpdate = false;
String lastUpdate = "--";
Ticker ticker;
void updateData(OLEDDisplay *display) {
drawProgress(display, 50, "Updating Time...");
worldClockClient.updateTime();
drawProgress(display, 100, "Done...");
readyForUpdate = false;
delay(1000);
}
void drawProgress(OLEDDisplay *display, int percentage, String label) {
display->clear();
display->setTextAlignment(TEXT_ALIGN_CENTER);
display->setFont(ArialMT_Plain_10);
display->drawString(64, 10, label);
display->drawProgressBar(10, 28, 108, 12, percentage);
display->display();
}
void drawClock(OLEDDisplay *display, int x, int y, int timeZoneIndex, String city, const uint8_t* icon) {
display->setTextAlignment(TEXT_ALIGN_LEFT);
display->setFont(ArialMT_Plain_10);
display->drawString(x + 60, y + 5, city);
display->setFont(Crushed_Plain_36);
display->drawXbm(x, y, 60, 60, icon);
display->drawString(x + 60, y + 15, worldClockClient.getHours(timeZoneIndex) + ":" + worldClockClient.getMinutes(timeZoneIndex));
}
void drawFrame1(OLEDDisplay *display, OLEDDisplayUiState* state, int16_t x, int16_t y) {
drawClock(display, x, y, 0, "New York", new_york_bits);
}
void drawFrame2(OLEDDisplay *display, OLEDDisplayUiState* state, int16_t x, int16_t y) {
drawClock(display, x, y, 1, "London", london_bits);
}
void drawFrame3(OLEDDisplay *display, OLEDDisplayUiState* state, int16_t x, int16_t y) {
drawClock(display, x, y, 2, "Paris", paris_bits);
}
void drawFrame4(OLEDDisplay *display, OLEDDisplayUiState* state, int16_t x, int16_t y) {
drawClock(display, x, y, 3, "Sydney", sydney_bits);
}
void setReadyForWeatherUpdate() {
Serial.println("Setting readyForUpdate to true");
readyForUpdate = true;
}
// this array keeps function pointers to all frames
// frames are the single views that slide from right to left
FrameCallback frames[] = { drawFrame1, drawFrame2, drawFrame3, drawFrame4};
int numberOfFrames = 4;
void setup() {
Serial.begin(115200);
Serial.println();
Serial.println();
// initialize dispaly
display.init();
display.clear();
display.display();
//display.flipScreenVertically();
display.setFont(ArialMT_Plain_10);
display.setTextAlignment(TEXT_ALIGN_CENTER);
display.setContrast(255);
WiFi.begin(WIFI_SSID, WIFI_PWD);
int counter = 0;
while (WiFi.status() != WL_CONNECTED) {
delay(500);
Serial.print(".");
display.clear();
display.drawString(64, 10, "Connecting to WiFi");
display.drawXbm(46, 30, 8, 8, counter % 3 == 0 ? activeSymbol : inactiveSymbol);
display.drawXbm(60, 30, 8, 8, counter % 3 == 1 ? activeSymbol : inactiveSymbol);
display.drawXbm(74, 30, 8, 8, counter % 3 == 2 ? activeSymbol : inactiveSymbol);
display.display();
counter++;
}
ui.setTargetFPS(30);
// You can change this to
// TOP, LEFT, BOTTOM, RIGHT
ui.setIndicatorPosition(BOTTOM);
// Defines where the first frame is located in the bar.
ui.setIndicatorDirection(LEFT_RIGHT);
// You can change the transition that is used
// SLIDE_LEFT, SLIDE_RIGHT, SLIDE_TOP, SLIDE_DOWN
ui.setFrameAnimation(SLIDE_LEFT);
// Add frames
ui.setFrames(frames, numberOfFrames);
// Inital UI takes care of initalising the display too.
ui.init();
Serial.println("");
updateData(&display);
ticker.attach(UPDATE_INTERVAL_SECS, setReadyForWeatherUpdate);
}
void loop() {
if (readyForUpdate && ui.getUiState()->frameState == FIXED) {
updateData(&display);
}
int remainingTimeBudget = ui.update();
if (remainingTimeBudget > 0) {
// You can do some work here
// Don't do stuff if you are below your
// time budget.
delay(remainingTimeBudget);
}
}
After a successful upload, open the Serial Monitor at a baud rate of 115200. Press the “EN/RST” button on the ESP8266 board. Now it should print its IP address.
Demo


Comments