
IoT Based RGB LED control
- Ramesh G

- Feb 17, 2021
- 3 min read
Updated: Jul 2, 2021
In this project to learn making of IOT based RGB LED Controller using ESP8266 Webserver with color picker.

Circuit diagram

Components required
ESP826612E
RGB LED common cathode
LCD 16X2 with I2C
Jumper wires
RGB LED
A RGB LED is commonly used component in electronics, generally, as it is used for indication purpose. You can use RGB LED in various projects like portable flashlight, LED indicator etc. An RGB LED can also be used for work according to condition like for condition 1st Red will glow, for condition 2nd green will glow and for condition 3rd blue will glow. We can use three different LED to perform the same task but this will increase the size of circuit and took more space on PCB or perf board.
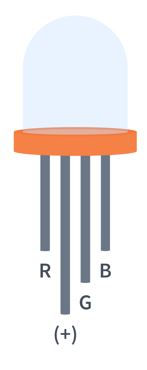
Pin Configuration
Pin No. Pin Name Description
1 R This terminal used for glowing LED in Red color
2 Gnd Common Cathode terminal (Ground)
3 G This terminal used for glowing LED in Green color
4 B This terminal used for glowing LED in Blue color
Applications
Industrial Application
Portable Flashlight/ torchlight
Light guides
Decorative Lighting
LCD backlight
Multi-color Light
Installing the ESP8266 Arduino Library
LiquidCrystal_I2C.h : you need to Download and install the LiquidCrystal_I2C library.
In your Arduino IDE, to install the libraries go to Sketch > Include Library > Add .ZIP library… and select the library you’ve just downloaded.
After installing the required libraries, copy the following code to your Arduino IDE.
Subscribe and Download code.


Subscribe and Download code.
Arduino Code
#include <ESP8266WiFi.h>
#include <DNSServer.h>
#include <ESP8266WebServer.h>
#include <LiquidCrystal_I2C.h>
LiquidCrystal_I2C lcd(0x27,16,2);
const char* ssid = "TP-Link_3200"; //Your WIFI SSID
const char* password = "9500112137"; //your WIFI Password
const int redLED = 14;
const int greenLED = 12;
const int blueLED = 13;
ESP8266WebServer webServer(80);
String webpage = ""
"<!DOCTYPE html><html><head><title>RGB LED control</title><meta name='mobile-web-app-capable' content='yes' />"
"<meta name='viewport' content='width=device-width' /></head><body style='margin: 0px; padding: 0px;'>"
"<canvas id='colorspace'></canvas></body>"
"<script type='text/javascript'>"
"(function () {"
" var canvas = document.getElementById('colorspace');"
" var ctx = canvas.getContext('2d');"
" function drawCanvas() {"
" var colours = ctx.createLinearGradient(0, 0, window.innerWidth, 0);"
" for(var i=0; i <= 360; i+=10) {"
" colours.addColorStop(i/360, 'hsl(' + i + ', 100%, 50%)');"
" }"
" ctx.fillStyle = colours;"
" ctx.fillRect(0, 0, window.innerWidth, window.innerHeight);"
" var luminance = ctx.createLinearGradient(0, 0, 0, ctx.canvas.height);"
" luminance.addColorStop(0, '#ffffff');"
" luminance.addColorStop(0.05, '#ffffff');"
" luminance.addColorStop(0.5, 'rgba(0,0,0,0)');"
" luminance.addColorStop(0.95, '#000000');"
" luminance.addColorStop(1, '#000000');"
" ctx.fillStyle = luminance;"
" ctx.fillRect(0, 0, ctx.canvas.width, ctx.canvas.height);"
" }"
" var eventLocked = false;"
" function handleEvent(clientX, clientY) {"
" if(eventLocked) {"
" return;"
" }"
" function colourCorrect(v) {"
" return Math.round(1023-(v*v)/64);"
" }"
" var data = ctx.getImageData(clientX, clientY, 1, 1).data;"
" var params = ["
" 'r=' + colourCorrect(data[0]),"
" 'g=' + colourCorrect(data[1]),"
" 'b=' + colourCorrect(data[2])"
" ].join('&');"
" var req = new XMLHttpRequest();"
" req.open('POST', '?' + params, true);"
" req.send();"
" eventLocked = true;"
" req.onreadystatechange = function() {"
" if(req.readyState == 4) {"
" eventLocked = false;"
" }"
" }"
" }"
" canvas.addEventListener('click', function(event) {"
" handleEvent(event.clientX, event.clientY, true);"
" }, false);"
" canvas.addEventListener('touchmove', function(event){"
" handleEvent(event.touches[0].clientX, event.touches[0].clientY);"
"}, false);"
" function resizeCanvas() {"
" canvas.width = window.innerWidth;"
" canvas.height = window.innerHeight;"
" drawCanvas();"
" }"
" window.addEventListener('resize', resizeCanvas, false);"
" resizeCanvas();"
" drawCanvas();"
" document.ontouchmove = function(e) {e.preventDefault()};"
" })();"
"</script></html>";
//////////////////////////////////////////////////////////////////////////////////////////////////
void handleRoot() {
// Serial.println("handle root..");
String red = webServer.arg(0); // read RGB arguments
String green = webServer.arg(1);
String blue = webServer.arg(2);
if((red != "") && (green != "") && (blue != ""))
{
analogWrite(redLED, 1023 - red.toInt());
analogWrite(greenLED, 1023 - green.toInt());
analogWrite(blueLED, 1023 - blue.toInt());
}
lcd.init(); // initialize the lcd
// Print a message to the LCD.
lcd.backlight();
lcd.setCursor(0,0);
lcd.print("Red Blue Green");
lcd.setCursor(0,1);
lcd.print(red.toInt());
lcd.setCursor(6,1);
lcd.print(green.toInt());
lcd.setCursor(12,1);
lcd.print(blue.toInt());
webServer.send(200, "text/html", webpage);
}
void setup() {
lcd.init(); // initialize the lcd
// Print a message to the LCD.
lcd.backlight();
pinMode(redLED, OUTPUT);
pinMode(greenLED, OUTPUT);
pinMode(blueLED, OUTPUT);
analogWrite(redLED, 0);
analogWrite(greenLED, 0);
analogWrite(blueLED, 0);
delay(1000);
Serial.begin(115200);
Serial.println();
WiFi.begin(ssid, password);
Serial.println("");
while (WiFi.status() != WL_CONNECTED) {
delay(500);
Serial.print(".");
}
Serial.print("IP address:");
Serial.println(WiFi.localIP());
webServer.on("/", handleRoot);
webServer.begin();
testRGB();
}
void loop() {
//dnsServer.processNextRequest();
webServer.handleClient();
lcd.setCursor(0,0);
lcd.print("Red Blue Green");
}
void testRGB() { // fade in and out of Red, Green, Blue
analogWrite(redLED, 0); // R off
analogWrite(greenLED, 0); // G off
analogWrite(blueLED, 0); // B off
fade(redLED); // R
fade(greenLED); // G
fade(blueLED); // B
}
void fade(int pin) {
for (int u = 0; u < 1024; u++) {
analogWrite(pin, u);
delay(1);
}
for (int u = 0; u < 1024; u++) {
analogWrite(pin, 1023 - u);
delay(1);
}
}
Then, upload the code to your NodeMCU board. Make sure you have selected the right board and COM port. Also, make sure you’ve inserted your WiFi Credentials in the code.
After a successful upload, open the Serial Monitor at a baud rate of 115200. Press the “EN/RST” button on the ESP8266 board. Now it should print its IP address. After That Open web address and Type IP address in address bar and get result.


Loved this hands-on project guide! The tutorial excellently demonstrates how IoT, RGB LEDs, and ESP8266 WebServer work together using a color picker UI, and the inclusion of LiquidCrystal_I2C support adds real-time feedback for interactive lighting control—perfect for DIY electronics, smart lighting, and home automation enthusiasts. For clearer visual debugging or circuit inspection, check whitescreen online A simple yet effective full-screen white display that helps photographers, radiologists, and artists with tracing, lighting, and screen cleaning. Open it on any browser or device—ideal for enhancing visual clarity during your next hardware or coding session!