Arduino IDE installation
- Ramesh G

- Nov 4, 2020
- 4 min read
The open-source Arduino Software (IDE) makes it easy to write code and upload it to the board. This software can be used with any Arduino board. The Arduino IDE can be used on Windows, Linux (both 32 and 64 bits), and Mac OS X. we’re ready to download the free software known as the IDE.
You can find the latest version of this software on the Arduino IDE download page.

To install the software, you will need to click on the link that corresponds with your computer’s operating system.
Once the software has been installed on your computer, go ahead and open it up. This is the Arduino IDE and is the place where all the programming will happen.
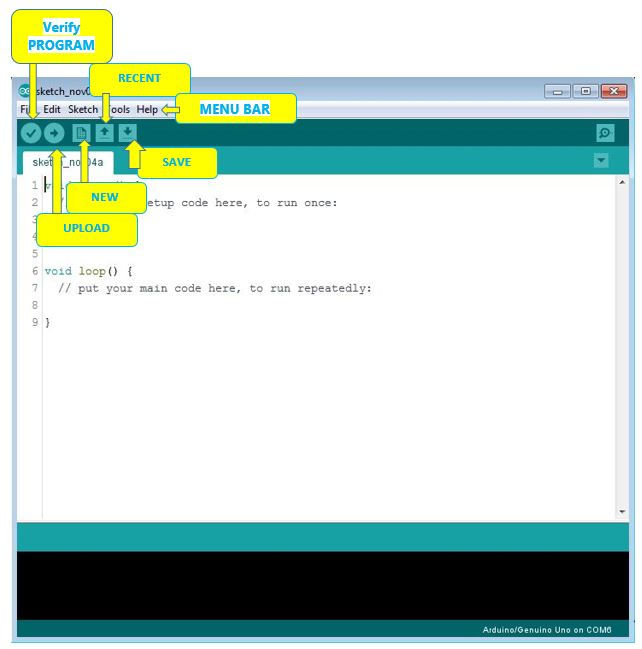
Take some time to look around and get comfortable with it.
Connect Your Arduino Uno
At this point you are ready to connect your Arduino to your computer. Plug one end of the USB cable to the Arduino Uno and then the other end of the USB to your computer’s USB port.
Once the board is connected, you will need to go to Tools then Board then finally select Arduino Uno.
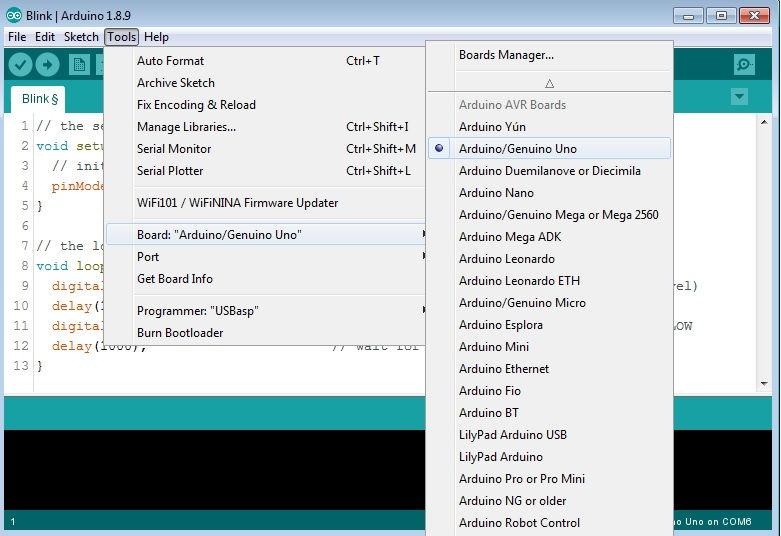
Next, you have to tell the Arduino which port you are using on your computer.
To select the port, go to Tools then Port then select the port that says Arduino.

Arduino Project 1: Blink an LED
It’s finally time to do your first Arduino project. In this example, we are going to make your Arduino board blink an LED.
If you need a refresher on the parts of the Arduino or how a breadboard works, check out our previous tutorial called Arduino For Beginners.
Required Parts
Arduino Uno Board
Breadboard – half size
Jumper Wires
USB Cable
LED (5mm)
220 Ohm Resistor
Connect The Parts
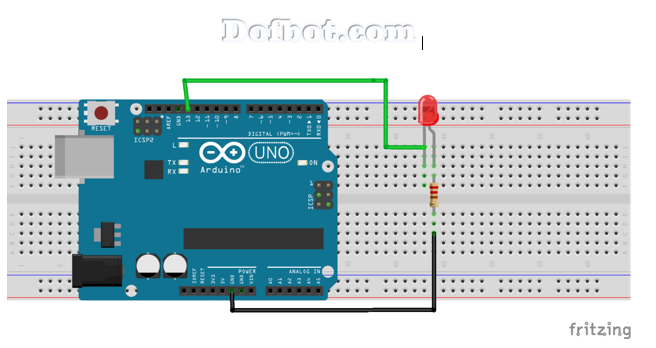
You can build your Arduino circuit by looking at the breadboard image above or by using the written description below. In the written description, we will use a letter/number combo that refers to the location of the component. If we mention H19 for example, that refers to column H, row 19 on the breadboard.
Step 1 –Wiring as per the Circuit diagram
Step 2 – Connect the Arduino Uno to your computer via USB cable
Upload The Blink Sketch
Now it’s time to upload the sketch (program) to the Arduino and tell it what to do. In the IDE, there are built-in example sketches that you can use which make it easy for beginners.
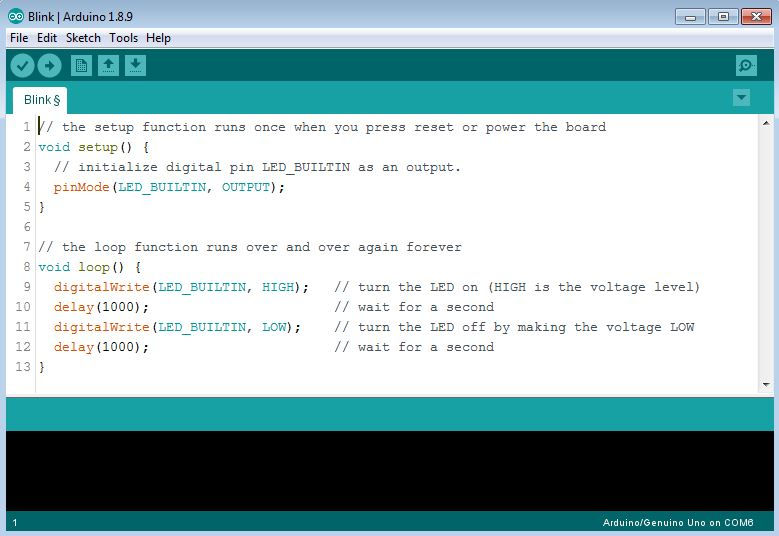
To open the blink sketch, you will need to go to File > Examples > Basics > Blink
OR
Code here
void setup() {
// initialize digital pin LED_BUILTIN as an output.
pinMode(LED_BUILTIN, OUTPUT);
}
// the loop function runs over and over again forever
void loop() {
digitalWrite(LED_BUILTIN, HIGH); // turn the LED on (HIGH is the voltage level)
delay(1000); // wait for a second
digitalWrite(LED_BUILTIN, LOW); // turn the LED off by making the voltage LOW
delay(1000); // wait for a second
}
Next, you need to click on the verify button (check mark) that’s located in the top left of the IDE box. This will compile the sketch and look for errors. Once it says “Done Compiling” you are ready to upload it. Click the upload button (forward arrow) to send the program to the Arduino board.
The built-in LEDs on the Arduino board will flash rapidly for a few seconds and then the program will execute. If everything went correctly, the LED on the breadboard should turn on for a second and then off for a second and continue in a loop.
Great! Congrats! You just completed your first Arduino project.
=============================================================================
Arduino Project 2: LED w/ Switch
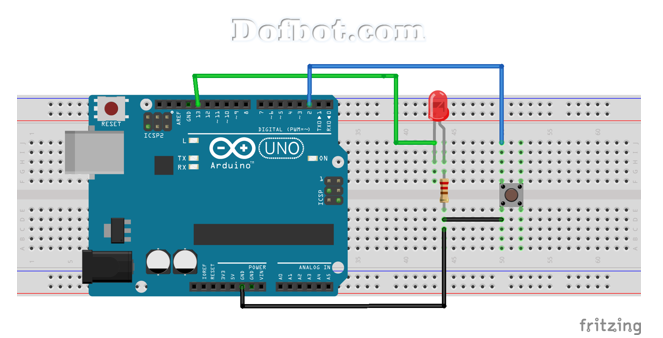
Now it’s time to talk switches and how they can be incorporated into Arduino projects. A switch is a electrical component that completes a circuit when pushed and breaks the circuit when released. In this project, we will be using a pushbutton switch to control an LED.
Required Parts
Arduino Uno Board
Breadboard – half size
Jumper Wires
USB Cable
LED (5mm)
Push button switch
10k Ohm Resistor
220 Ohm Resistor
Connect The Parts
You can build your Arduino circuit by looking at the breadboard image above or by using the written description below. In the written description, we will use a letter/number combo that refers to the location of the component. If we mention H19 for example, that refers to column H, row 19 on the breadboard.
Step 1 –Wiring as per the Circuit diagram
Step 2 – Connect the Arduino Uno to your computer via USB cable
Upload The Switch Sketch
Now it’s time to upload the sketch to the Arduino that will allow us to use a switch. As with the blink sketch, there are example programs already loaded in the Arduino IDE that we will be using.
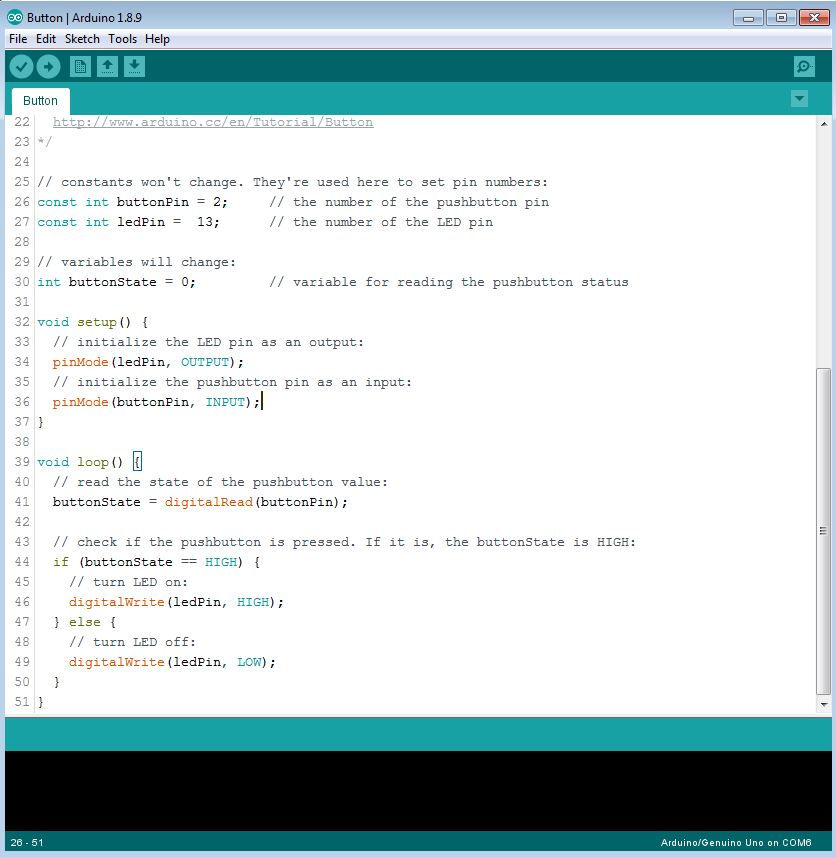
In order to use a switch, we have to load the file called “Button” which can be found here: File > Examples > Digital > Button
OR
Code here
const int buttonPin = 2; // the number of the pushbutton pin
const int ledPin = 13; // the number of the LED pin
// variables will change:
int buttonState = 0; // variable for reading the pushbutton status
void setup() {
// initialize the LED pin as an output:
pinMode(ledPin, OUTPUT);
// initialize the pushbutton pin as an input:
pinMode(buttonPin, INPUT);
}
void loop() {
// read the state of the pushbutton value:
buttonState = digitalRead(buttonPin);
// check if the pushbutton is pressed. If it is, the buttonState is HIGH:
if (buttonState == HIGH) {
// turn LED on:
digitalWrite(ledPin, HIGH);
} else {
// turn LED off:
digitalWrite(ledPin, LOW);
}
}
Next, you need to click on the verify button (check mark) that’s located in the top left of the IDE box. Once it says “Done Compiling” you are ready to upload it. Click the upload button (forward arrow) to send the program to the Arduino board.
Press the button switch on the breadboard and you should be able to turn on and off the LED as shown in the below video.
Troubleshooting
If you are having any problems with the projects we did, make sure the following has been checked.
Verify the correct leg of the LED is connected properly. LONG leg to positive and SHORT leg to negative.
Make sure the Arduino IDE shows the correct board. Go to Tools > Board then select Arduino Uno.
Make sure the Arduino IDE shows the correct port. Go to Tools > Port then select the port that says Arduino.
Verify all component connections are secure with the Arduino board and breadboard.



Comments